
This is documentation for the process I used to anodize aluminium at Hedron Hackerspace. It is a relatively complex setup (especially for someone like me without much chemistry experience), but once you learn and carry out the procedure, it becomes a lot easier. The real trick, as far as I’m concerned, is that there is a lot of flexibility in the process and outcome — which is unusual for programmers or precision-oriented engineers.
SAFETY MATERIALS:
– Close-toed shoes
– Long pants
– Lab coat (with sleeves) or other arm protection
– Safety goggles
– Caution tape (for cordoning off an area)
– Nitrile gloves
– Sodium Bicarbonate (baking soda), 4lb
– Vinegar, one or more gallons
– Distilled water, several gallons
– Wood pulp or sawdust (for absorbing spills)
– Additional Large HDPE bucket (Home Depot or other), one or more
– Cleaning rags or cloths or towels
– Trash bags
SAFETY NOTES:
1. This procedure requires the use of several HIGHLY corrosive chemicals, and splash protection AND prevention is an absolute necessity. These chemicals are:
a. Sulfuric Acid (H2SO4) ⚠︎
b. Sodium Hydroxide (NaOH) ⚠︎
2. Perform this procedure OUTSIDE or in a well-ventilated area with fans directing gasses outside. There is chemical off-gassing during the anodization reaction.
3. Due to the risk of chemical spillage, it is best to perform this procedure OUTSIDE anyway. Here is how you should protect yourself in the case of a spill:
i. Immediately check your own skin/clothing for contamination.
ii. Immediately check any observers or participants for contamination.
iii. Immediately wash off any contamination with distilled water and remove contaminated articles of clothing.
iv. Go in for a further washing at a cleaning station or sink with tap water.
v. Inform anyone involved or nearby that there is a chemical spill to be cleaned.
4. In order to decontaminate an area from a spill, here are the relevant steps:
i. For Sulfuric Acid, spread Sodium Bicarbonate (baking soda) anywhere where the acid has spilled to create a slurry, until there is no longer any bubbling reaction in the areas of contamination. For Sodium Hydroxide, use vinegar. You can mix this around with a stick or some other sort of implement in order to thoroughly neutralize the chemical spill. Once the bubbling has stopped, there is not enough acid/base to pose a high-level chemical danger.
ii. These chemicals can dry up and remain crystalized on surfaces, so anywhere that this may be a concern, wash it down with distilled water. If this step is necessary, also use more Sodium Bicarbonate or vinegar on the new puddle to ensure it is neutralized.
iii. Collect the slurry into a large HDPE container using whatever means is best for transferring it from its location. This could be a towel or cloth used like a scoop, or it could be a mop/broom type situation. In the case of using a mop or broom, thoroughly wash it afterward.
iv. Anywhere where slurry is too wet to collect up, spread LOTS of sawdust to absorb it. Then this sawdust can be collected into the HDPE container using the same procedure as in step (iii). For any other spill, there is no need to neutralize, just add sawdust and add to container.
v. Add lots of extra sawdust to the HDPE container and mix it up, so that the substances contained within cannot spill. Bag this up with a trash bag and dispose in an accessible dumpster.
Procedure Materials and Equipment:
– 5 HDPE buckets
– Nitrile gloves
– Distilled water, several gallons, 5+
– Dish/container for pre-cleaning parts
– Dawn dish soap
– Scrub pad or sponge / pipe cleaner / brush for tight corners
– Aluminium welding rods
– Cooler + water tubes
– Water pump
– Bench power supply + leads
– Aluminium cathode (8″x2″ or thereabouts)
– Sodium Hydroxide bucket
– Desmut bucket
– Sulfuric Acid bucket
– Dye colors
– Nickel Acetate sealant
– Trays for dye/sealant bath
– Hotplates (2 heated surfaces)
– Thermometers, two
– Scale
– Measuring spoons/cups
– Timer
– Pen/paper
Setup:

The above figure shows the basic layout for bringing a cleaned aluminium part through the chemical process to a dyed and sealed state. (From my original notes). BE CAREFUL WHILE SETTING UP. DO NOT SPILL THE NaOH or the H2SO4! Upon request, I can add here a section explaining how to create the solutions from scratch, but for the time being they are pre-prepared.
You will need to set up the treatment stations in an order that makes them accessible to one another, however that works for you. The order is as follows:
1. Part cleaning station with soap, distilled water, and scrubbers
2. Empty HDPE washing bucket
3. NaOH bucket (pre-prepared at Hedron as of writing)
4. Empty HDPE washing bucket
5. Desmut bucket (pre-prepared)
6. Empty HDPE washing bucket
7. Anodizing station (H2SO4, cooling system, bench supply, cathode)
8. Empty HDPE washing bucket
9. Dye bath on hotplate
10. Nickel Acetate bath on hotplate
To set up the anodizing station, here is what you will need to know:
i. The H2SO4 bucket is pre-prepared and should be placed into one of the large HDPE buckets with some water at the bottom (not so much that the H2SO4 bucket floats).
ii. The cooling apparatus should be set with the pump pulling water (NOT H2SO4!) from under the H2SO4 bucket, and the other tube should be feeding water back into bottom of the large HDPE bucket at a distance from the pump (so that there’s good temperature distribution in the water). The H2SO4 solution should stay within the range of 20°C and 25°C, but I suspect that the temperature could be even lower since hard anodizing (Type III) can be done around even 0°C. Thus, you can err on the side of temperature caution and set the cooling apparatus at a cool temperature like 18°C (or lower?) and that will still have a good outcome.
iii. The outer surface layer of the aluminium cathode should be removed via wire wheel before being placed in the H2SO4 solution, as an thick oxidation layer on the surface will decrease conductivity. As of the time of writing, there is an aluminium cathode among the supplies already. In any case, the cathode should have a significant portion submerged in solution, as well as a portion exposed and outside of the solution. You will not want for your parts to anodize to touch the cathode at any point during the anodization, and ideally you can keep an inch or two at least between any of your parts and the cathode throughout the process.
iv. The bench power supply should be set up such that the negative lead (black) is connected to exposed portion of the aluminium cathode. The positive (red) lead will be connected to the welding-rod rack, which will hold the parts you want to anodize (this is covered in the “Procedure” section). Neither of the electrical leads should be submerged in the solution. You will eventually configure the power supply based on current (A) rather than voltage (V), but the exact current you want will be calculated depending on your part’s surface area (this is also covered in the “Procedure” section).
Additionally, for any of the three pre-prepared buckets, there is a green mark on the side of the container. The water of the solution will evaporate over time, so you will want to refill each bucket slightly with distilled water until the green mark. Distilled water is the main consumable resource during this whole process, given that you must wash everything off between steps.
Procedure:
As a brief introduction — the process of anodizing aluminium is, as the name suggests, the process of using aluminium as an anode in an electrochemical circuit. The intended result of using aluminium as an anode is that the acid substrate will aggressively eat into the aluminium surface and it will grow a thick layer of aluminium oxide, which is tougher and more chemically resistant than the pure metal. This oxide skin hardens the surface and protects it against wear. An additional effect is that by allowing the acid to eat deep into the aluminium surface, the aluminium oxide will be like a porous sponge, which can hold small particles of dye (or whatever else), making dyed metal a possibility. Aluminium 6061 is a common and suitable aluminium alloy for anodizing, but you can research any other alloy you think you might want to use.
To begin, the first thing that you must do is don your protective and cleanliness gear. That is, if you haven’t already got on your long pants, close-toed shoes, sleeves, and new gloves, then get them on. You will want to change gloves or wash them with soap often. Any time you are going to touch the part you plan on oxidizing, you will want to have a perfectly clean glove surface to do so.
After you are protected and wearing clean gloves, clean the surface of the part that will be anodized in a receptacle or sink. Apply Dawn dish soap and scrub the part on every surface exposed to air. Any contamination on the surface whatsoever, especially from oils, will cause the anodization to fail in that spot. Wash off all the soap using distilled water; a good rinse will do.
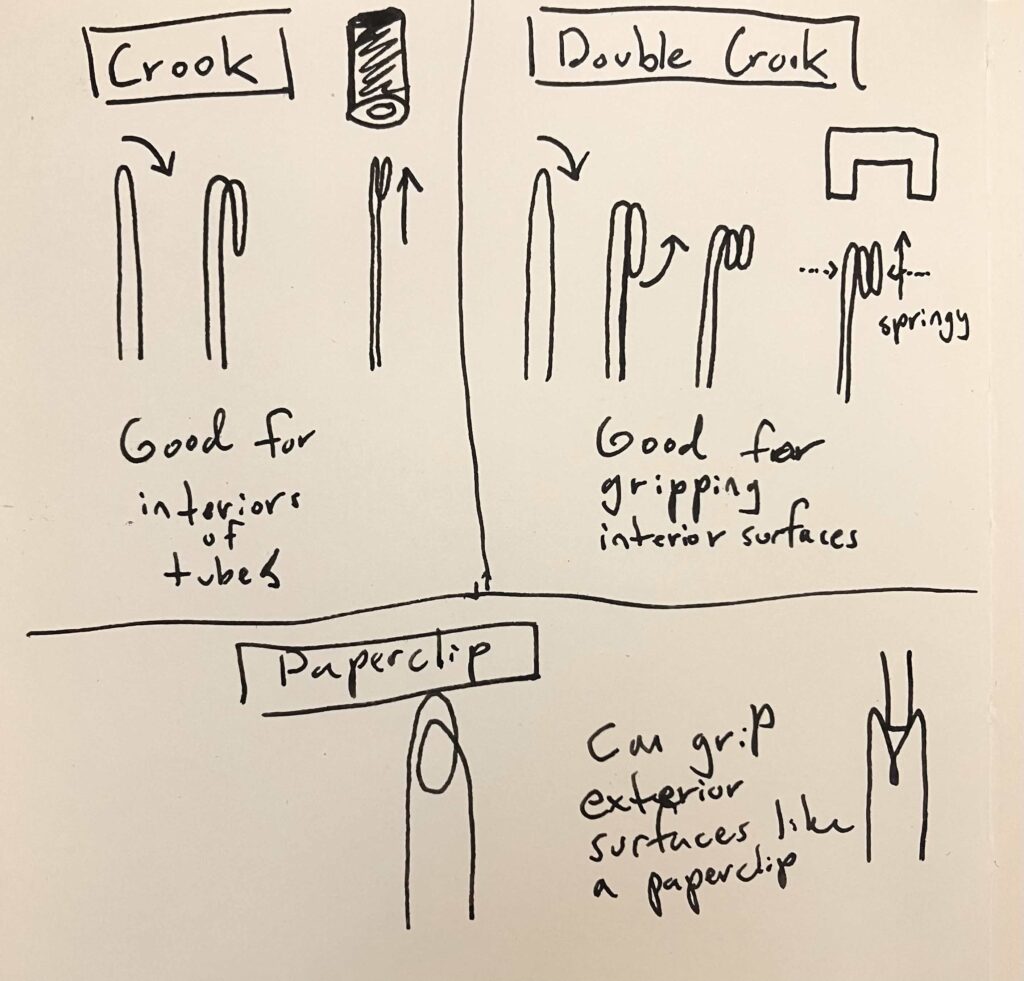
Here is where you will want to shape aluminium welding rod into a useful rack for suspending your parts in the different chemical solutions. The rack should hold onto the sides of the chemical buckets and provide a good electrical connection with your part. Firm contact with your part at 2 or more points is relatively essential, because weak points of contact will film over with oxide and the part will stop anodizing midway through. This requires some creativity in how to connect up to the parts, but here are a few rod-bending styles that tend to work — they all depend on the springiness of the rod aluminium. Aluminium racks can be reused if you let them soak in the Sodium Hydroxide for 10+ minutes to remove any anodized layer.
Now that you have your rack with clean parts, you will want to submerge the parts in the Sodium Hydroxide for around 2 or 3 minutes. This is a relatively short step, and you can lift and drop the rack a bit every once in a while to make sure bubbles don’t form on the surface. The point of this step is to remove the thin, outermost layer of aluminium oxide that forms naturally on aluminium when exposed to air. Wash the parts off on all surfaces with distilled water.
Next, submerge your parts in the desmut solution. This step is used to dissolve away any copper, magnesium, or other metals that remain on the surface — aluminium usually comes in alloy form after all. The Sodium Hydroxide easily removes aluminium oxide, but not so much the other metals. This step ought to last between 3 and 10 minutes. Wash the parts off on all surfaces with distilled water.
Next, submerge your parts in the Sulfuric Acid, making sure to leave at least an inch between any part surface and the cathode. Hook up the positive (red) lead to your rack in a place where it will have a good connection. You will need to calculate the amperage for this portion based on the surface area of aluminum on your part or parts. The equation for this calculation is the following:
– 720= (A/sqft)*minutes/mils
– A = amperes of current
– sqft = sqft of aluminium to anodize
– minutes = time for the aluminum to be in-circuit
– mils = thousandths of an inch of thickness you want the oxide layer
The funny thing about this equation is that you have to decide on three variables yourself in order to get the final variable out. That being said, what you will want to do is work from the most restrictive variables first, and also focus on what limiting factors you have. For example:
– Your bench power supply tops out at 5A
– A reasonable range of thickness for Type II anodizing is 0.5 – 1 mil
– You have only one part with a surface area of 0.2 sqft
If you max out your supply and your thickness here, the result will be:
720 = (5/.2)*minutes/1
720 = 25*minutes
minutes = 28.8
Once you have your amperage, set your power supply to “Current Limiting” mode, which means that the voltage will stay at whatever level necessary to maintain the configured current. In the case of this electrochemical process, it is only current that matters for causing the relevant reaction to occur. You can take this time, maybe 5 or 10 minutes before completing this step to begin heating up your dying and sealing baths. Once your parts have been anodizing long enough, then they are ready to be removed and washed with distilled water yet again.
Don’t ask me what that reaction is, because I don’t really know. There will be off-gassing of what I think is Hydrogen gas and it reeks so bad when you get your nose right up on it, that even I have an adverse gag reflex to it (despite being without a sense of smell since birth). It doesn’t really smell around where you’re doing it (I think), but if you get right up on the gas it’s terrible (at least to me).
Now, your parts can finally be dyed and sealed in the hot dying and sealing baths. This process is a little finicky, as you want there to be an even absorption of dye into your part. There are several issues that can arise during this step that will cause uneven results. One thing is that, different color dyes can be made of completely different substances, and they will also have different particle sizes. That said, each color has its own slightly different temperature range (written on the dye bottles). Another thing is that if the aluminium gets too hot anywhere, it will naturally close its spongy aluminium oxide pores. This is why you must control the heat VERY carefully during this step, and not let it get too hot over 60°C. The parts should also be kept from sitting right where the heating surface warms your dying tray, since the greatest heat will be precisely where the heating surface contacts your tray. This can be done by moving and flipping your part with some welding rod or some other article — just like you were sautéing some onions. Another way would be to have your parts sitting on a rack away from the bottom of the tray yet fully submerged. The length of time to be dyed should usually be under 10 minutes, and you can just check to see if it looks ready. The length of time and temperature to soak in the Nickel Acetate sealant is written on the container but should be between 5-10 minutes at 70-85°C.
Congratulations. You can now remove your part, wash and cool it, and it is complete.
Cleanup:
Since this involves strong chemicals, you should be wondering what to do with them when you are finished. As for the wastewater from your process, where you washed the chemicals and soap off between steps with distilled water, this has low enough concentrations that it can be put safely down a drain. There was also the cooling water for the anodization station, which can also be put down the drain. The dye and the Nickel Acetate can be returned to their original containers for reuse, or dumped if they are overly contaminated somehow. Dye coloring in the Nickel Acetate should not pose a serious problem for functionability. As for the buckets with the stronger chemicals, you can safely replace the watertight lids and place the buckets into the newly empty large HDPE buckets as a secondary layer of spill protection in the case of a sudden issue on the internal layer (which is also HDPE). The chemical buckets and large HDPE buckets should be replaced in 5 years AT THE LATEST. HDPE can hold up for a very long time, but it should not be pushed to any sort of limit.
Anyway, once the chemicals and dye are stored away, everything else can be cleaned and stored for reuse at a later date. If I missed anything here, go ahead and take care of it and let me know so I can include it. Also, keep your wits about you. You will be the one doing the thing, so take your own considerations into account for safety and whatnot.